
Removing and replacing dated popcorn ceilings is a multi-step process that, when done correctly, can completely transform your home. Many homes built decades ago have popcorn ceilings, which were once popular for hiding imperfections and reducing noise. Over time, these ceilings can start to look old, dirty, or damaged, making a room feel outdated and less welcoming. They can also trap dust, allergens, and even mold, affecting indoor air quality.
At Seattle Environmental Services, we specialize in helping homeowners safely update their ceilings, taking care of every step from testing for hazardous materials like asbestos or lead paint to the final smooth finish. By choosing professional assistance, you avoid common pitfalls such as damaging the drywall, creating excessive dust, or exposing yourself to harmful substances. We use the right tools, protective measures, and techniques to remove the old popcorn ceiling texture efficiently while keeping your home clean and safe.
This process ensures your home is not only more visually appealing but also healthier and safer for your family.
Phase 1: Preparation and Safety
Test for Asbestos and Lead Paint
Homes built before the 1980s may have ceilings with asbestos, and older paint can contain lead. These materials are hazardous, so testing is essential. At Seattle Environmental Services, we recommend:
- Wet a small area of the ceiling with water.
- Scrape a quarter-sized sample into a sealable bag.
- Send the sample to an accredited lab for testing.

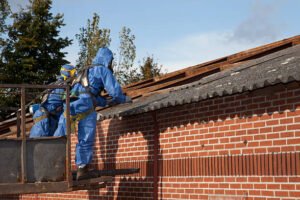
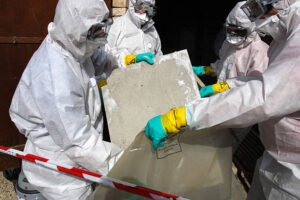
If asbestos is present, we handle removal safely, or we can encapsulate it by installing new drywall over the ceiling. DIY removal is strongly discouraged due to serious health risks.
Gather Tools and Materials
Before starting, make sure you have the right tools and protective gear:
- Safety gear: Respirator (HEPA filters if asbestos is confirmed), goggles, gloves, and disposable coveralls.
- Room protection: Heavy-duty plastic sheeting or drop cloths, painter’s tape, and utility knife.
- Removal tools: Pump or garden sprayer for water (optionally add a little fabric softener or dish soap), wide drywall/putty knife (8–12 inches), pole sander, joint compound, primer, and ceiling paint.
Prepare the Room
- Remove all furniture or cover immovable items with plastic sheeting.
- Cover the floor with overlapping plastic and tape it to the baseboards.
- Turn off power to ceiling fixtures and remove lights or smoke detectors. Seal wires with electrical tape.
- Seal doorways and vents with plastic sheeting to contain dust.
- Open windows for ventilation but cover them with flaps to prevent debris from escaping.
Phase 2: Removing the Popcorn Ceiling
Wet the Ceiling
Use a pump sprayer to lightly mist a small 4×4 foot section of the ceiling with water. Let it sit for 10–15 minutes to soften the texture. Avoid over-wetting, which can damage the drywall. Painted ceilings may require multiple applications or a chemical paint remover to soften the material.

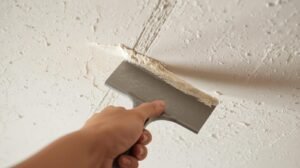
Scrape the Texture
- Hold your drywall knife at about a 30-degree angle and gently scrape the softened popcorn material.
- Let debris fall onto the plastic sheeting below.
- Use a smaller putty knife for edges and corners.
- If needed, re-spray the ceiling and wait a few minutes before continuing.
Clean Up
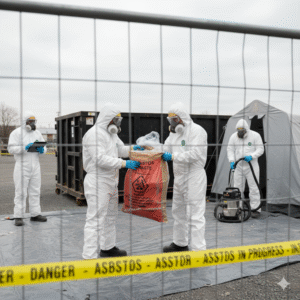
- Roll up plastic sheeting from floors and walls carefully, keeping debris contained.
- Double-bag waste in heavy-duty garbage bags and dispose of it according to local regulations.
Seattle Environmental Services ensures all debris is removed safely, leaving your room ready for the next steps.
Phase 3: Finishing or Replacing the Ceiling
Inspect and Repair
- Check for gouges, scratches, or nail pops on the bare drywall.
- Apply joint compound to damaged areas and feather the edges.
- Once dry, sand smooth with fine-grit sandpaper while wearing a mask to avoid dust.
- Wipe the ceiling with a damp cloth to remove sanding residue.
Prime and Paint for a Smooth Finish
- Apply a quality primer to seal the drywall and ensure even paint adhesion.
- Once dry, apply two coats of ceiling paint for a fresh, modern appearance.

Alternative Ceiling Replacements
If you want a completely new look or the ceiling has asbestos, consider:
- Installing new drywall over the old ceiling: Encapsulates the old surface safely.
- Skim coating: Apply thin layers of joint compound for a smooth, modern finish.
- Installing new materials: Wood planks, decorative tiles, or 3D panels can add a unique aesthetic to your home.
Why Choose Seattle Environmental Services
With Seattle Environmental Services, homeowners can update their ceilings without the risks of DIY removal and enjoy a clean, safe, and stylish new ceiling that improves both the appearance and air quality of their home. We offer:
- Safe handling of asbestos and lead paint testing
- Full ceiling removal and refinishing
- Professional sanding, priming, and painting
- Custom ceiling installation options
Call to Action:
Book Now our Services to transform your ceilings safely and professionally. We’ll help homeowners achieve a smooth, updated ceiling with minimal disruption, ensuring your space looks fresh, modern, and inviting.
“Every ceiling we update brings a brighter, more modern look to your home—let us help you achieve it.”